Showing posts with label ACW. Show all posts

Saturday, August 17, 2019

Dispatches from the front....


It's been a mad couple of weeks with very little time for gaming and painting all very frustrating.... 
I really need to put some focus on the hobby as the toys won't paint themselves.

With a new job there has been very little time for painting or is it that the I just hate painting cavalry and the Haitian Colonial Cavalry have been sitting on the paint table for a couple of weeks now, I need a spark to get them going.

Meanwhile the painting queue just got a little larger.

I picked up a couple of packs of Havana Volunteers which gives me a couple of light Infantry units for the Spanish. I saw these advertised a few months ago from QH Miniatures and thought they might be worth a couple of packs.
Thanks to Steve M for sending on my package. After a mix up the package from Spain went missing, but thankso Steve who tracked me down via a couple of club members and sent them on, so there are some benefits of gaming odd periods and blogging about it :-)

Meanwhile last weekend saw a quick trip over to the M5 Living History Show at Spetchley Hall, with a mix of periods covered Ancient Greeks, Romans, Medieval, Vikings, Napoleonic, American Civil War, WW1 and WW2 together with a number of traders it's always a good way to spend a Sunday morning.


Everyone looked to be enjoying themselves and it was nice to see some cavalry in action in the ACW engagement, the chaps representing the Brits in Khaki were very impressive and got me thinking about painting some up. I picked up the following in one of the book tents....

Some light reading for the holidays - could this be a new project?

Definitely a period not gamed but can you get the figures for the Brits in Tibet and is there a uniform guide for the Tibetans let alone figures.

I can feel a few late nights on the internet coming up.
Any suggestions chaps on who makes figures for Younghusband's Expedition?

Sunday, June 17, 2018

Uncharted Seas..... Back from the depths...

These have been in the back of the cupboard for so long that they have been completely redesigned by Warcradle Studios when they acquired the rights from Spartan Games. Still it's nice to get this lot finished and be available for gaming even if they only come out once in a while.


First up a couple of Shroud Mages - Tormentor Class Heavy Cruisers.
According to the blurb. The Tormentor Class Heavy Cruiser is an aptly named piece of dark machinery. Its guaranteed extra speed, improved firepower and ramming ability over a standard cruiser make it a terror for any opposing commander to face.


I also finished the Flagship which is quite a beast, plenty of guns on the port and starboard sides and a couple of turrets for when you can't get the angle you need. 

Also off the production line are a couple of extra's from Peter Pig's ACW range, I figured these would come in handy for transports or prizes to be seized, they fitted the general theme of the Shroud Mages, I just need to create some stats for them.


Whilst moving stuff around I also came across these torpedo boats, which will come in handy again they are in need of a couple of house rules, but they took no time at all to paint and wash, once I had sculpted the bases.


They do look rather good when compared to the Flagship. I am really not sure how much staying power they will have on the table.


Given the time lag between painting the the first starter pack and the new batch I am pretty pleased with the colour match. I had to mix up a bronze colour to match the central boiler unit on the ships, the original Dwarf Bronze had long since dried up.... but the new mix came up rather well and a coat of Matt Varnish should tie them in perfectly.


Looking forward to tonight - Now all I need to do is find the rules....

Saturday, June 09, 2018

Plantation Workers and ACW Reinforcements.

Having been shamed by the last weeks bridge I started hunt a little deeper in the cupboard of shame and figured over the coming months I would work my way through this excess metal and resin completing some of those items which were brought for a purpose, but got neglected when something shiny came along.
First up 8 Confederate Infantry perfect for an extra section in SP2, why they never made it on to the paint table in the first place who knows.... I think it was due to the fact that I tend to paint in batches of no more than 16 figures and these were the excess?


They will bolster the rebel forces for when we restart the ACW campaign which has stalled in recent months. On a similar theme next out of the cupboard were the following plantation workers.


Redoubt Enterprises - Field hands - perfect to flesh out the Haiti table as Coffee Pickers or for the Union to free. Not the best sculpts compared to some of the others on the market, one of these hard working fellows if from the Perry's, but Redoubt do  create those oddities that can complete a range.


Next up a couple ot items which have been in the cupboard for at least 4 years....

Wednesday, January 24, 2018

Wyvern Wargamers - Woodville Campaign - Battle 1- The Town of Pointington.

Sunday night saw the opening salvo in the Wyvern Wargamers - Woodville ACW Campaign.
With the Union Command advancing on the town of Pointington.


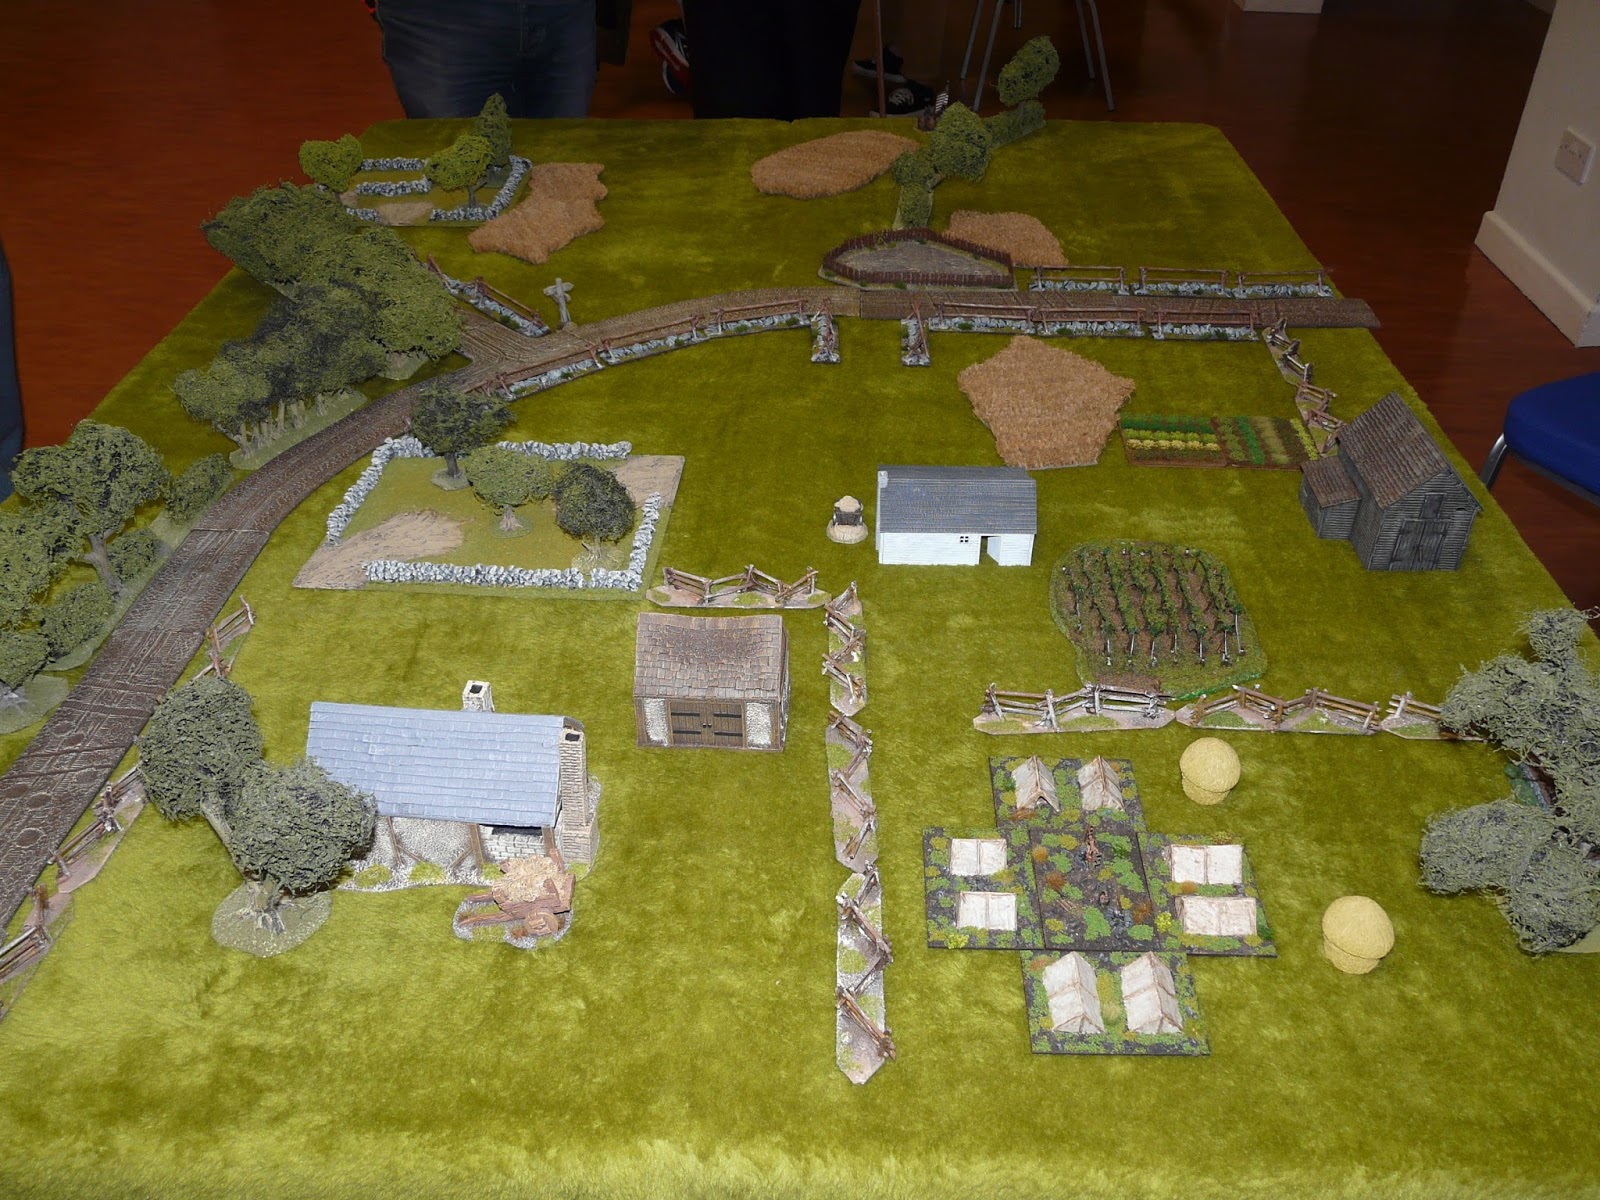
With initiative in hand the Union Players selected a flank attack on the town hoping to catch the Confederate Players on the hop. The terrain was laid out and the Union player was tasked with advancing through light farm land to seize the Reb's camp (bottom right) and win the game.


As intelligence was passed to the Union High command it soon became apparent that this was no isolated detachment judging by the number of flags entered into the bag on turn one. This could still be a bluff, so the first Union formation deployed on the road to Pointington only to be faced off by almost double their number as the tiffin chit was pulled.


With some early successes and the chits falling in their favour the Union players set about pouring fire into the first Confederate formations, Union skirmishers crept forward through the cornfields to close with the enemy firing line, kills were few. Meanwhile more and more Confederates filled the table, including artillery and skirmishers creeping around the Union flanks. This was definately no outpost.
 

The weight of fire landing on the Union formations from both front and flank was starting to tell, shock increased and then the formation split, then stumbled backwards, yet still the lead rained down.
  

The Union forces fell back their force morale dropping rapidly to zero leaving the field to the defenders.

As the afternoon sun rose, both sides reviewed their losses.
The initiative had switched to the Confederates, the difference in force morale mean't that the losses on the Reb's side were replaced, infact a number of the Union skirmishers surrounded in the farm house decided to switch sides as their officer was marched into captivity.

Picking through the battlefield litter, the Confederate command increased their supplies whilst the Union player  was forces to abandon several sacks of supplies.

The Union players saw 6 of their number dead, with 3 others captured, together with an Officer. The wounded (4) were loaded on to a wagon 'liberated' from a local farm and taken back to the aid station for treatment.

Both sides had seen the elephant - No what would happen next...

Saturday, January 20, 2018

Wyvern Wargamers - ACW Campaign - Opening Moves.

The Wyvern Wargamers - ACW Campaign is a go.
With forces drawn up and support points picked both commands set about giving orders for the first few days.
 
Days one and two pass without incident apart from the odd straggler wandering into camp or the loss of the occasional sack of grain, but on the morning of the third day reports come in to the Union field commanders that a body of troops have been spotted in the town of Pointington and they look like they are here to stay.

Lacking any further scouting reports the Union commander orders his troops out from their column of march and orders a Flank Attack on the Confederate position.

Both players set about pulling their various forces together as sunday night will see the opening skirmish in the Wyvern 'Woodville' Campaign.

Stay tuned for the first battle report.
 
Notes to players.
Following the terrain rules within the Too Fat Lardies Campaign Suppliment - Dawn and Departures.
The Union player has the initiative and selects the choice of Battle. I rolled for the terrain features and we have on the table the following principle terrain items as we are in a Town square.
Small Yard Orchard Orchard
Two Small Yards Two Small Buildings Small Yard

The defender on the night will place the first item followed by the attacker until all 6 items are placed, the defender can then move one single item upto 36", the attcker will then the do the same.
Then for fairness I the umpire will add the roads and various other terrain to flesh out  the table.
 
In my view the table should reflect the outskirts of Pointington and the buildings should be of a rural nature - farm house, sheds and barns. Any roads or tracks running through the terrain should run from top to bottom.

Tuesday, October 31, 2017

Wyvern Wargamers - ACW Campaign for Sharp Practice.

On the back of one of the Wyvern's all day bashes a number of us have decided to embark on a short ACW campaign to keep us busy over the winter months and ensure the painting tally for the year continues to tick over.

I have been reading the Too Fat Lardies Campaign Suppliment over the summer and it has a number of areas of interest which might make some of the club games more interesting, as there will be consequences at the end of the game.

With 3 players per side the original map and suggested forces was a little to small, so I have increased the map to double that in the suppliment and supplied each side with roughly 180 points to select from. I have kept to the principle by putting a central road in but by splitting it should give commanders a challange on how to cover the terrain on the map.

It's late in the War and the Confederates are on the defensive, the Union forces enter from the Blue Arrow, can they defeat the Rebel command?

As we speak players are totting up points and force combinations before setting off on their respective mission.

Campaign updates will appear on the blog when intelligence is open to all, commanders will recieve their own updates via e-mail.

Stay tuned for more.

Wednesday, September 06, 2017

Wyvern Wargamers - Big Bash 2017 - ACW

When fellow club members paint at a far greater rate than you, you have to be creative in your game design.

The view from the Union lines

Sunday saw an outing of for the ACW collection using Sharp Practice 2 - I have enough to scrape together a Confederate force of around 140 points, whilst Paul and Dane can generate a cast of  000's. We wanted to get all the toys on the table but it did seem a little unfair on the rebs so we came up with a scenario which allowed for a much reduced Confederate Force to face off against the all of the Union Army.
Looking North with the Green staging points and Red deployment Points

We created 4 Forces for the Union command each owned by a different player and allowed them all to advance on the table at once. The table was split into 4 segments each one containing a separate confederate force and two deployment markers. 
The Union player could only advance into the second segment (see the small green markers at the table edge) once they had broken the force morale of the first line of defence and so on and so forth.

If it went to plan we could recommision the confederate forces in each segment. Each fresh and ready for action whilst the Union player would have to marshall their troops and try and keep casualties down knowing that each segment would have new defenders to man the defences.

So how did it play out?

The first deployment point captured by Union Skirmishers without a shot being fired.
On the left flank the first Union regiment takes heavy fire.
Pressure builds on the Confederate Command as more troops enter the table.
The Union Cavalry enter the fray - Damn repeating carbines....
The first line of defence crumbles and the force morale drops to zero.
Those pesky cavalry push forward out stripping its supporting infantry.
Pay back the second line is unmasked - The cavalry take cover.
Shock begins to mount as more southerns are activated.
The cavalry retire only to be replaced by yet more Infantry.
Pressure builds on the right flank
The South holds firm as the clock ticks down.

We were perhaps a little too grand with our table size but it did make for a fun game with everyone involved. As Confederates we looked to break individual Union units knowing it would slow the advance and make it difficult to push forward for the next wave. The Union players got drawn into lengthy fire fights where perhaps the bayonet would have made a greater impact to break Confederate force morale.

A great days gaming, which we agreed was a well fought draw although the Union side received casualties at a ratio of 3:1

Sharp Practice once again gave a great game with multiple commands and was well balanced even though the odds were against the men from Texas.

Friday, July 21, 2017

Milam County goes to war (again).

Every now and again you have one of those games that really spikes your enjoyment of the hobby.
Sunday night saw the dusting off of the Wyverns ACW collection using Sharp Practice and a reminder of why these rules are one of my favourite.

A simple engagement with both sides looking to break each others morale.
It started so well for the South, a good roll on the morale chart and a force morale of 11 for the encounter vs the North's 10.

The forces were reasonably even, we (the South) opted for a marksman, a medic and another section of Regulars where as the blue coats went for ammo and water carts together with an extra section.


The North flanked left seeking out the open ground as we sent our skirmishers through the trees on the right.
Pushing our main force through the field our commander stood in something rather nasty taking his status down a level, I was now wishing he paid for that water cart.

At every turn the boys from Texas seemed to be facing two regiments and were slowly worn down by both enemy fire and the local ladies who called a few of my lads away.


Skirmishers nibbled away at the formed bodies but the crashing volley's and the excess shock forced the South to retire losing by a single force morale point.

Still the poor run of form continues for Captain Story of Milam County.

A cracking evenings gaming and to think I was on the verge of putting these on ebay.

Sunday, July 16, 2017

Sunday morning ramblings...

As promised a quick shot of Trent Miniatures and Foundry mixed together not a bad mix in terms of height and scale. A mentioned before the Foundry sculpts are a little on the repetitive side but mixed together they look fine.


With 30+ Maroons now complete I need to start thinking about how to represent them within Sharp Practice, it's a toss up between Militia if I look at the later period of the war or perhaps Clan if the hills and depending on who they are fighting.

It looks like I may have to spend a few hours moving the photo's from Photbucket back to the hard drive... having been greeted with this message recently. I don't really want to be parting with $399 just for the link. Sorry fella's I won't be blackmailed into parting with that kind of money, good job it was only the postings from 2011 effected.

Photobucket

Tonight sees a return to the ACW and "Milam County Grays", 5th Texas Infantry. These chaps have not had an outing since Terrible Sharp Sword, it will be interesting to see how they stand up to the Federals within Sharp Practice 2 - No pressure but they have yet to win a game ---- Yet....


Sunday, November 18, 2012

Warfare 2012 - Kallistra Antietam Refight

Sunday and the annual trip to Warfare, once again the Wyvern Wargamers linked up with the excellent Kallistra terrain system who were showcasing their ACW 10/12mm figure range.
The plan was to play through elements of the Battle of Antietam in particular Burnside's Bridge.


As in history Burnside's bridge was to prove a tough nut to crack, as in history time and again the Union forces rushed the bridge on to push back by rebel fire.


On the Right flank the Union forces secured bridge but were unable to make head way through the cornfield as the Confederate forces rushed to plug the gap.


A great day out and nice to play a big game, quite a change from the usual skirmish games.
Well done to Chris from the club who claimed 2nd place in the SAGA tournament, definitely a veteran on the SAGA gaming scene.


Saturday, March 03, 2012

Battle of Gailey's Crossroads - Confederate AAR

My very good friend Paul very recently wrote a battle report for the recent ACW outing over at Evesham Wargames Club with the line "history belongs to the side which ends up writing the history". Well the war is not over my friend this is the offical battle report  from the Southern Republic regarding the Battle of Gailey's Crossroads.

The Scenario was a simple one advance up the table and clear out any federal forces blocking our path. We knew that behind the Town of Bishampton the Union forces were starting to stack up so a fast advance was the order of the day.


The  view from the Southern Front.

Carl's Division took the lead, valliant souls from the heart of Alabama, the advance was swift coming into sight of  Gailey's Crossroads after a couple of turns.

Photobucket
Union Cavalary were seen deploying behind the picket fences and stone walls, their repeating rifles would be deadly if we entered into a protracted fire fight.
General Carl urged his men forward supported by artillery fire from Evesham Hill.
What the Union Cavalry add in fire power they lack in numbers they were hindered by some of the most unluckly dice rolling ever to be seen on a wargames table, Cavalry units were running low on ammunition, others throwing up thick smoke which screened the avancing Confederate forces.
The Union forces deployed an artillery battery to stem the Confederate tide, but this to suffered from a lack of ammo.... ( who was the quartermaster????)
Photobucket


Photobucket

General Carl ordered his men forward with minimal casaulties and shock he charged his bayonets and rushed straight for the Union Cavalry, going against the doctine of previous games of exchanging volley fire first !!!

The Confederate forces numbers told and the union were cavalry feel back in some disorder, it would be several turns before they were able to reform and recover.
Bouyed by their success Carl's Division pushed on but they were starting to suffer a number of casualties and shock, Big Men and Officers were spread across the front and they were desperate to reorder their forces.
Photobucket

Mean while General Stuart's Texas Division entered the table, delayed due to the Generals late lunch.

Photobucket

Carl's Division was slowed by elements of the 76th New York and Union Zouaves who were coming off blinds and were deploying to the front, the men from Alabama knew no fear and pressed on, out stripping the supprting Texas units.

They were now out numbered 3:1 including the returning Union Cavalry under Lt Bacon.
Photobucket

Several volley's were fired by the Union line forcing the Confederate forces to seek shelter in the wheat field, elements of Carl's divsion began to slink away unable to respond to the Union fire and with two few Officers available to reorder the line.
Photobucket

As dusk began to fall, the men from Texas arrived to see their brothers from Alabama retiring from the line with Bacon's cavalry shadowing their withdrawal....
We had secured the cross roads and it would be a bloody task for the Union to take it back.
Mission accomplished....... :-)